

If your kitchen feels tired or outdated, you don’t necessarily need to replace the cabinets. Refinishing them can completely transform your space — often in just a few days and at a fraction of the cost of a full remodel. With the right tools, techniques, and a little patience, you can give your cabinets a fresh, modern look that lasts for years.
This guide walks you through everything from preparation to final touches, with practical tips and techniques to help you get professional-looking results.
Why Refinish Instead of Replace?
Refinishing is one of the smartest home improvement moves you can make, and here’s why:
-
Cost Savings: New cabinets can easily cost $5,000–$15,000, while refinishing often costs $200–$800.
-
Eco-Friendly: Keeps existing materials out of landfills and reduces waste.
-
Customization: You choose the color, stain, and finish to perfectly match your kitchen style.
Before Refinish: Assessing Your Cabinets
Before you grab a paintbrush, take a good look at your cabinets:
-
Check for Damage: Look for water stains, warping, or cracked panels.
-
Evaluate Surfaces: Make sure the material can be painted or stained — solid wood, plywood, and MDF with a veneer are good candidates.
-
Choose Your Finish: Decide if you’re going for paint, stain, or a clear protective coat.
Pro Tip: Snap “before” photos so you can really appreciate the transformation later.
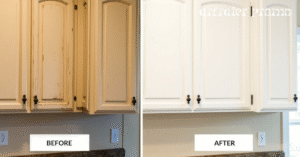
After Refinish: The Transformation
Once reassembled, step back and enjoy your handiwork. The difference can be dramatic — from worn and dated to fresh and modern, without the heavy expense.
Tools and Materials You’ll Need
Tools:
-
Screwdriver (for removing hardware)
-
Sandpaper (medium and fine grit) or an electric sander
-
Paintbrushes and foam rollers
-
Painter’s tape
-
Drop cloths or plastic sheeting
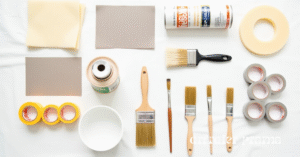
Materials:
-
Degreaser or wood cleaner
-
Wood filler (for cracks or dents)
-
Primer (stain-blocking for painted finishes)
-
Paint or wood stain
-
Clear protective finish (polyurethane, varnish, or wax)
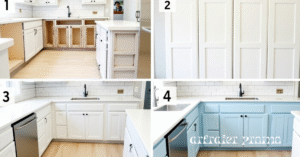
Step-by-Step Guide to Refinishing Kitchen Cabinets
1. Remove Cabinet Doors and Hardware
Take off all doors, drawers, handles, and hinges. Label each door and its location for easy reassembly.
2. Clean the Surfaces
Kitchen cabinets collect grease and dust over the years. Use a degreaser or wood cleaner to thoroughly wipe them down. Let them dry completely.
3. Sand the Cabinets
Lightly sand painted surfaces to remove the glossy layer, or sand stained wood down to bare wood for restaining. Wipe away dust with a damp cloth.
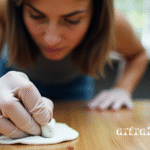
4. Repair Damage
Use wood filler to fix dents, holes, or cracks. Once dry, sand the filled areas until smooth.
5. Apply Primer
Primer helps paint stick better and prevents stains from showing through. Use a foam roller for a smooth finish and allow it to dry completely.
6. Paint or Stain
-
Painting: Apply thin, even coats using a foam roller or high-quality brush. Let each coat dry before applying the next.
-
Staining: Apply with a clean cloth or brush, following the wood grain, and wipe off excess stain.
Step 7: Apply a Polyurethane Finish
Once the stain is fully dry, apply a polyurethane finish to protect the wood and add shine. Use a high-quality brush and work in long, even strokes. Allow it to dry for the recommended time before applying a second coat.

8. Reassemble and Update Hardware
Once everything is fully dry, reattach the doors and hardware. Consider replacing knobs and pulls for an added style boost.
For detailed instructions, check out This Old House’s step-by-step refinishing guide, which walks you through every stage of the process.
Techniques for a Professional Finish
-
Always work in a dust-free environment.
-
Use a foam roller instead of a brush for a streak-free look.
-
Avoid thick coats — multiple thin coats dry smoother and last longer.
-
Keep cabinet doors flat while drying to prevent drips.
Tips for Best Results
-
Don’t rush drying times — patience pays off in durability.
-
Test your paint or stain on a hidden spot first.
-
Protect surrounding surfaces with drop cloths and painter’s tape.
Before & After Comparison
| Feature | Before Refinish | After Refinish |
|---|---|---|
| Appearance | Faded, scratched, dull | Smooth, fresh, vibrant |
| Cost | $5,000–$15,000 (replace) | $200–$800 (refinish) |
| Time Required | Weeks | 2–5 days |
| Environmental Impact | More waste | Eco-friendly reuse |
Conclusion
Refinishing kitchen cabinets is a satisfying DIY project that can completely change the look and feel of your kitchen. With some planning, the right materials, and a little patience, you can achieve a high-end look without the high-end price tag — and enjoy a kitchen you’ll love for years to come.
Frequently Asked Questions (FAQs)
What is the easiest way to refinish kitchen cabinets?
The simplest method is to clean, lightly sand, prime, and paint with a foam roller for a smooth, streak-free finish.
Can I resurface my own kitchen cabinets?
Yes, with the right tools and preparation, most homeowners can successfully refinish their cabinets without hiring a professional.
How can I redo my kitchen cabinets without replacing them?
Options include painting, staining, or applying a veneer or laminate overlay for a new look.
Can I restain kitchen cabinets without sanding?
You can, but light sanding or using a liquid deglosser ensures the stain adheres properly and lasts longer.
How to refinish kitchen cabinets with polyurethane?
Apply polyurethane as a topcoat after painting or staining to protect the finish from scratches, moisture, and daily use.
How to refinish laminate kitchen cabinets?
Use a bonding primer designed for laminate, then paint or apply a laminate-safe coating for best results.