

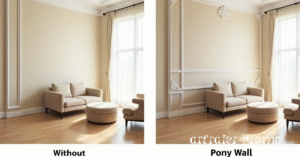
A pony wall, also known as a half wall, is a short wall that doesn’t extend to the ceiling. It’s typically about 3 to 4 feet tall and is used to divide space without fully closing it off. Whether you’re designing an open-concept layout or want more structure in your room, a pony wall can be both a stylish and functional solution.
Let’s explore its uses, benefits, popular design ideas, and how you can build one yourself.
Common Uses of a Pony Wall
Pony walls can be used in many areas of a home. Here’s how homeowners typically use them:
-
Room Divider: Create a visual break between spaces like the kitchen and living room without sacrificing openness.
-
Bathroom Separation: Use a pony wall to separate the toilet or shower from the rest of the bathroom.
-
Entryway Definition: Add a pony wall near the front door to create a small entry zone.
-
Staircase Barrier: Use it along staircases as a guardrail alternative.
-
Kitchen Counter Support: Pony walls often support breakfast bars or extended countertops.
Benefits of Installing a Pony Wall
Pony walls offer multiple advantages for both design and functionality:
| Benefit | Description |
|---|---|
| Cost-Effective | Requires fewer materials and labor than full walls. |
| Open Feel | Maintains light flow and line of sight between rooms. |
| Customizable | Can be built to any height and finished with trim, tiles, shelves, or more. |
| Functional Division | Divides space without full enclosure. |
| Versatile | Suitable for bathrooms, kitchens, living rooms, and more. |
Popular Pony Wall Design Ideas
Looking for inspiration? Here are some creative ways to make your pony wall stand out:
-
With Built-in Shelves: Add shelves into the pony wall for books or decor.
-
With Glass Panels: Attach glass panels on top to maintain openness while adding elegance.
-
With Shiplap or Wood Trim: Use wooden finishes to match rustic or farmhouse décor.
-
Tile Accent Walls: Especially great for bathrooms—tiling adds color and waterproofing.
-
Support for Countertops: In the kitchen, pony walls can support countertops for extra bar seating.
How to Build a Pony Wall: Step-by-Step Guide
Building a pony wall is a beginner-friendly DIY project. Here’s a basic process:
Materials Needed:
-
2×4 lumber
-
Drywall or panel board
-
Wood screws or nails
-
Stud finder, level, drill, and saw
-
Tape measure
-
Construction adhesive
-
Joint compound and paint or finish
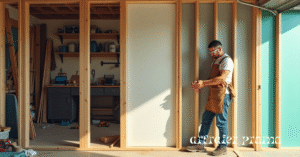
Step-by-Step Process:
-
Plan & Measure:
-
Decide the wall height and length.
-
Mark the floor where the wall will be placed.
-
-
Locate Wall Studs:
-
Use a stud finder to secure your new wall into existing studs or floor joists.
-
-
Build the Frame:
-
Create a rectangular wooden frame using 2x4s for the top and bottom plates and vertical studs in between.
-
Standard spacing between studs is 16 inches.
-
-
Secure to Floor & Wall:
-
Attach the bottom plate to the floor and the side of the wall or adjoining structure.
-
-
Attach Drywall or Paneling:
-
Cover the frame with drywall or your chosen panel.
-
Secure with drywall screws and adhesive.
-
-
Finishing Touches:
-
Tape the joints, apply compound, sand, and paint or decorate as needed.
-
-
Optional Additions:
-
Add trim, shelves, or tile for a custom look.
-
Conclusion
A pony wall is a fantastic way to enhance your home’s layout without losing openness or natural light. It’s practical, attractive, and even DIY-friendly. Whether you want to divide rooms, support countertops, or create stylish zones, pony walls offer endless design possibilities.
Frequently Asked Questions (FAQs)
Q1: How tall is a standard pony wall?
A: Most pony walls range from 36 to 42 inches in height, but you can customize it to your space.
Q2: Can pony walls be load-bearing?
A: Typically, pony walls are non-load-bearing. However, if you plan to support a countertop or bar top, the structure should be reinforced.
Q3: What’s the difference between a pony wall and a knee wall?
A: A pony wall divides space horizontally in a room. A knee wall is usually built under sloped ceilings (like attics) to support rafters.
Q4: Can I remove a pony wall easily?
A: Yes, since most pony walls aren’t load-bearing, they’re relatively easy to remove or modify.
Q5: How much does it cost to build a pony wall?
A: DIY costs range from $100 to $300, depending on materials and finishes. Hiring a professional could range from $300 to $800+.