

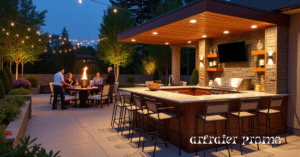
Building your own outdoor kitchen may sound like a big job—but with the right plan, tools, and a bit of elbow grease, it’s completely doable. A DIY outdoor kitchen adds more than just cooking space. It transforms your backyard into a place where meals, memories, and summer nights come together.
This guide walks you through everything you need to know—from the early planning stages to the final touches, and even the costs involved.
Why Build Your Own Outdoor Kitchen?
There are a lot of reasons to take the DIY route when it comes to outdoor kitchens:
-
It’s cost-effective. Labor is one of the biggest expenses in home projects. Doing it yourself saves big.
-
It’s fully customizable. You get to design the layout, pick the materials, and choose the appliances that match your cooking style.
-
It adds value to your home. A well-built outdoor kitchen is a great selling point for future buyers.
-
It’s a fun project. If you enjoy hands-on work, this is a satisfying upgrade with long-term benefits.
Start with a Solid Plan
Before you pick up a hammer or order materials, take time to plan:
-
Pick the perfect spot. Choose a space near your indoor kitchen (for easier plumbing/electric work), and consider wind, sun, and shade.
-
Check your local building codes. Especially if you’re adding gas, water, or electricity.
-
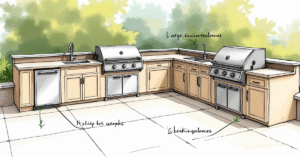
Decide on the layout. L-shaped, U-shaped, or straight-line designs are all popular. Think about flow and functionality.
-
Think about features. Grill, sink, mini-fridge, bar counter, pizza oven—what do you really need?
Tools You’ll Need
You don’t need a fancy workshop to build your outdoor kitchen, but a few basic tools go a long way:
| Tool | What It’s For |
|---|---|
| Power drill | Assembling frames and hardware |
| Circular saw | Cutting wood or cement boards |
| Level | Making sure everything is straight |
| Angle grinder | Trimming metal or stone |
| Tape measure | Accurate measurements |
| Concrete mixer | Optional for making countertops |
| Masonry tools | If you’re using concrete blocks |
Choosing the Right Frame
The frame is the backbone of your kitchen, and you’ve got three main choices:
-
Wood Frame (pressure-treated) – Easy to work with, but must be protected with cement board and fire-resistant materials.
-
Metal Stud Frame (galvanized steel) – More durable and fire-safe, though it can be tricky to cut.
-
Concrete Blocks – Super strong and weatherproof, ideal for a permanent setup.
Best Materials for Surfaces
Your outdoor kitchen needs to handle weather, heat, and moisture. Popular materials include:
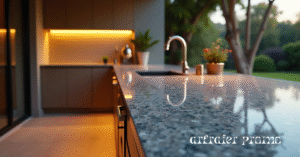
-
Countertops: Concrete, granite, tile, or stainless steel.
-
Cabinet exteriors: Stone veneer, tile, stucco, or treated wood.
-
Flooring: Pavers, stamped concrete, composite decking, or natural stone.
Add Your Appliances and Features
You can go simple or go all out. Here are a few popular options:
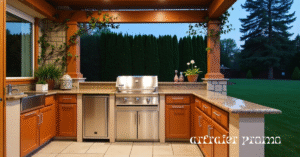
-
Grill (gas or charcoal) – The heart of any outdoor kitchen.
-
Sink – Connect to a water line or use a gravity-fed system.
-
Mini-fridge – Keep drinks and food cold without running inside.
-
Counter space – For prepping meals and serving guests.
-
Cabinets – Store utensils, tools, and accessories.
-
Pizza oven, side burners, bar seating – Optional upgrades for the true entertainer.
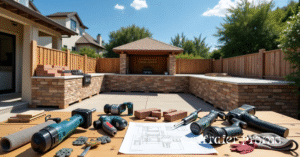
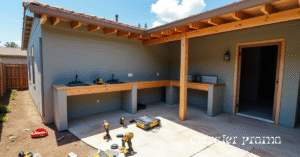
Step-by-Step: Building Your DIY Outdoor Kitchen
-
Measure your space and design the layout.
-
Build the frame using wood, steel studs, or blocks.
-
Add cement board or weather-resistant sheathing.
-
Install countertops and exterior finishes.
-
Add appliances and secure them in place.
-
Connect water and electrical (if needed).
-
Seal and weatherproof all surfaces.
Check out this detailed step-by-step guide from Handyman Connection for layout ideas, material tips, and expert build advice.
DIY Outdoor Kitchen Cost Breakdown
Here’s a rough guide to what you might spend:
| Item | Estimated Cost Range |
|---|---|
| Frame materials | $200 – $800 |
| Countertops | $300 – $1,500 |
| Grill | $300 – $2,000 |
| Sink + Plumbing | $100 – $500 |
| Storage Cabinets | $200 – $1,000 |
| Mini-fridge or Cooler | $100 – $400 |
| Flooring (optional) | $400 – $1,200 |
| Total Range | $1,500 – $6,000+ |
You can save more by using salvaged materials or skipping plumbing and electric.
Tips for a Successful Build
-
Always leave gaps for ventilation behind grills and fridges.
-
Use non-combustible board and finishes near open flames.
-
Choose sealed or weatherproof materials for long-term durability.
-
Plan utility lines early—don’t try to add them after building.
Pros and Cons of a DIY Outdoor Kitchen
| Pros | Cons |
|---|---|
| Save on labor | Requires time and effort |
| Full creative control | Some construction skills needed |
| Adds home value | May require permits/utilities |
| Great for entertaining | Weather exposure affects longevity |
Conclusion
A DIY outdoor kitchen is a rewarding project that transforms your yard into a space you’ll use for years. Start with a solid plan, keep your budget in mind, and work step-by-step. Whether you build a simple grill station or a full chef’s paradise, the satisfaction of creating it yourself makes every meal outdoors taste better.
Frequently Asked Questions (FAQs)
How much does it cost to build a DIY outdoor kitchen?
You can expect to spend between $1,500 and $6,000, depending on materials and features.
Can I build an outdoor kitchen without water or electricity?
Yes! A basic kitchen can run without utilities using portable appliances and a cooler or gravity-fed sink.
What is the cheapest material for outdoor countertops?
Tile is often the most affordable. It’s easy to install and comes in many styles, though it needs sealing.
Can you build your own outdoor kitchen?
Absolutely. With a good plan, basic tools, and some time, many homeowners build their own from scratch.
What is the best DIY outdoor countertop?
Concrete is a favorite for DIYers. It’s budget-friendly, durable, and customizable with molds or stains.